Setup and Tutorials
First 15 Minutes With a Vibe Coding Keyboard
Jun
The first 15 minutes with a vibe coding keyboard should feel practical, not ceremonial. You do not need a perfect keymap, a complete automation library, or a dramatic desk makeover. You need to find out whether a physical controller can make your AI coding loop feel less scattered.
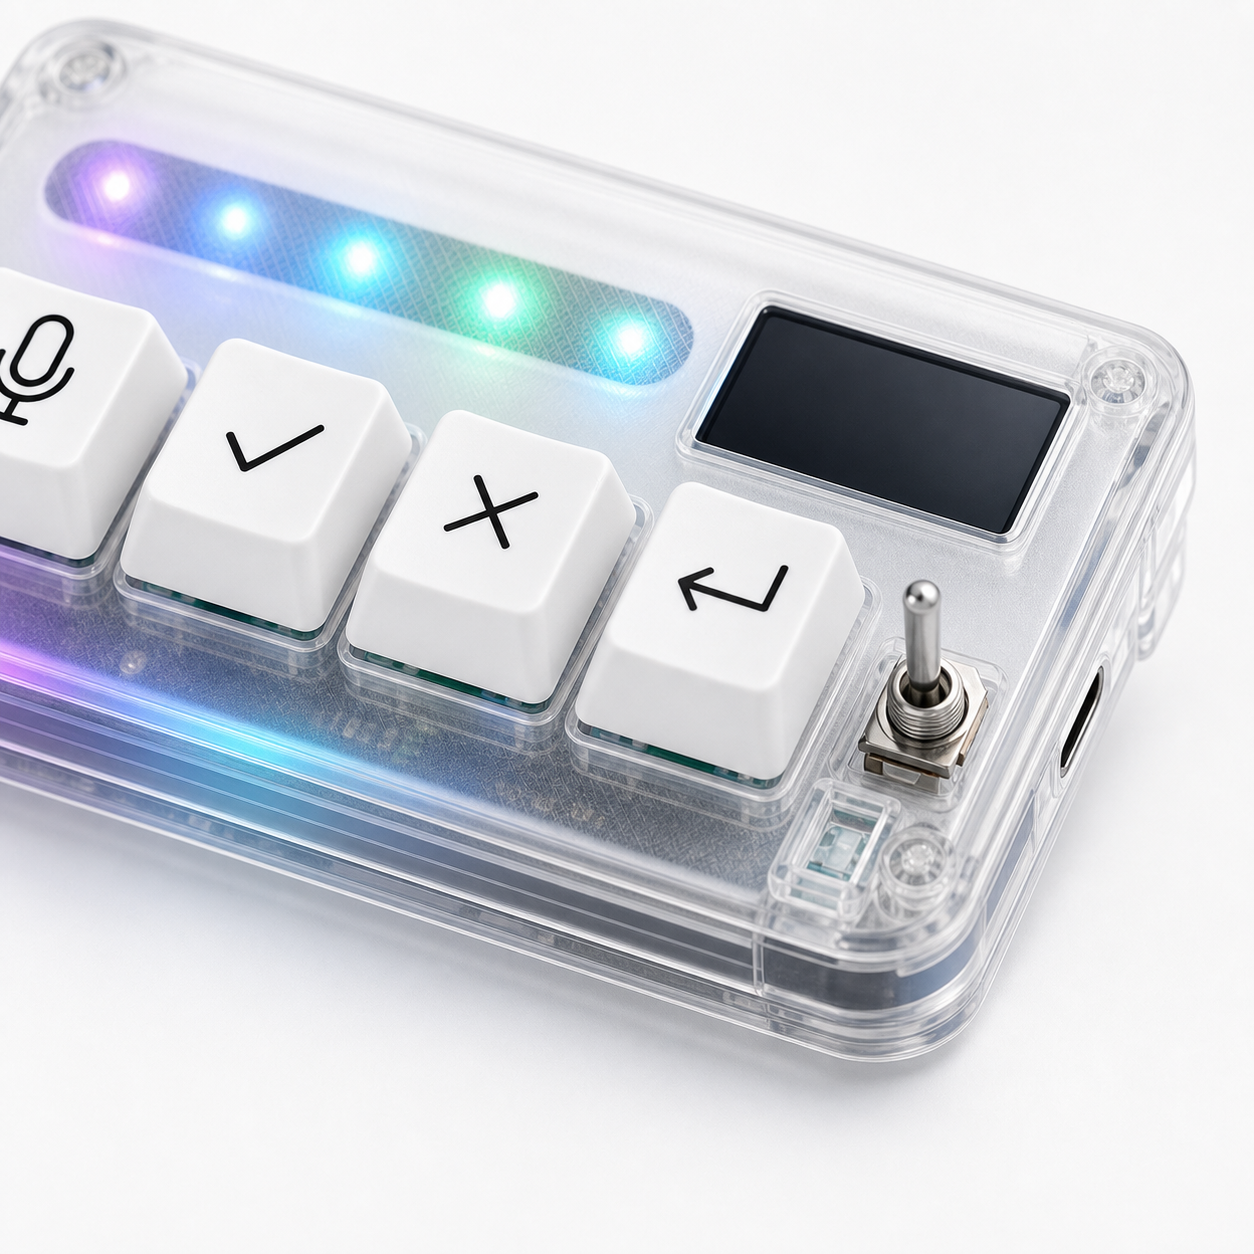
HarnessKeys gives a few important actions a dedicated place: voice input, approve, cancel, and return. That is enough for a useful first test. The trick is to run a small session that reveals the device’s value without creating chaos in your real project.
Minute zero: put it where your hand already wants to go
Before connecting anything, place the keypad on your desk. Try the left side of your main keyboard, the right side near the mouse, or just above the keyboard if your desk is shallow. Rest your hand naturally and press the imaginary keys without looking.
If you have to reach too far, the device will feel like a novelty. If it sits where your hand already pauses during thinking, it can become part of the workflow quickly. Placement matters because vibe coding is full of small decisions. You do not want to hunt for the control surface each time an AI tool asks for approval.
Minutes one to three: connect without changing mappings yet
Connect HarnessKeys using the simplest available mode for your desk. If you are unsure, start with USB. It gives you a direct first test and avoids pairing questions. Bluetooth can come later when you want a cleaner laptop setup or fewer cables.
Do not open your most important project yet. Open a simple text field or blank document. Press each key once. Watch what registers. This is a calm hardware test, not a productivity test.
If nothing appears to happen, check the connection, port, pairing state, and active window before assuming the keypad has a problem.
Minutes three to five: name each key out loud
This sounds silly, but it works. Point to each key and say its job: voice, approve, cancel, return. You are building a tiny mental model. Later, when an AI agent asks for confirmation or starts heading in the wrong direction, you want your hand to know where to go without reading labels.
Do not assign ten meanings to four keys. The first session is about clarity. A key that means “approve in one app, paste in another, and submit in a third” may be powerful later, but it is confusing during onboarding.
Four plain meanings are enough.
Minutes five to seven: test the microphone trigger
Open the voice input tool, dictation feature, AI assistant field, or browser environment you plan to use. Press the mic key and say a short, boring prompt. Try something like “write a short comment explaining this function” or “list three possible test cases.”
If dictation fails, check microphone permissions. Operating systems and browsers can block microphone access even when the hardware input works. Also confirm that the correct microphone is selected. A laptop may listen to its built-in mic while you expect a headset, or the browser may need permission for the current site.
The first voice test is about reliability, not eloquence.
Minutes seven to nine: approve something harmless
Ask your AI coding tool for a suggestion that cannot damage anything. A code explanation, a test outline, or a documentation sentence works well. Use the approve key only when you understand what is being accepted.
This is a good moment to notice how a physical approve key feels. It should create intention. You are not mindlessly pressing enter through prompts. You are making a small, deliberate decision.
If approve feels too easy to hit accidentally, move the keypad or rethink the key position before using it on real agent actions.
Minutes nine to eleven: cancel on purpose
Now create a harmless reason to cancel. Ask for a suggestion, then decide not to continue. Press cancel. The point is to teach your hand that stopping an AI flow is normal. You do not need to panic, switch windows, search for a tiny button, or remember a shortcut when the direction is wrong.
A dedicated cancel key is one of the more underrated parts of an AI workflow keypad. AI tools can be useful and overeager at the same time. A fast stop signal lets you experiment without feeling trapped.
Practice it once while nothing important is at stake.
Minutes eleven to thirteen: use return to resume control
Return is the quiet key. It is not as flashy as voice or approve, but it matters because AI coding sessions are full of small transitions: back to prompt, back to editor, back to a new line, back to the next instruction. A physical return action can keep the session moving without making you reach across the full keyboard each time.
Try editing a prompt, moving back to a text field, or continuing a short instruction sequence. Notice whether the key feels natural or whether your hand still prefers the main keyboard.
If return does not earn its place, do not force it. Adjust later.
Minutes thirteen to fifteen: do one real but tiny task
Pick a real task small enough to throw away if needed. Ask your AI assistant to explain a file, suggest a refactor, draft a commit message, or create a short checklist. Use voice to start, approve only the part you want, cancel one bad idea if it appears, and return to continue.
This two-minute task tells you whether HarnessKeys belongs in your workflow. The feeling you are looking for is not magic. It is less friction. Fewer tiny hand movements. Less searching for the right control. More attention left for the actual code.
What to change after the first quarter hour
After 15 minutes, change only one thing. Move the keypad, adjust one mapping, or switch connection mode. Do not redesign the whole setup. Too many changes make it impossible to know what improved the experience.
If the device worked but felt awkward, placement is usually the first suspect. If placement felt good but actions failed, check software mapping and permissions. If everything worked, keep the setup boring for a day and let muscle memory develop.
You can review the HarnessKeys product page for the intended workflow, or contact support if there is a real product or order issue.