Setup and Tutorials
HarnessKeys Setup Checklist for First-Time Users
Jun
First-time setup should not feel like assembling a second computer. HarnessKeys is meant to make AI workflow control more physical and immediate, so the first session should be simple: connect it, place it where your hand naturally rests, test each key, map the basic actions, and run one small AI coding task before changing everything.
This checklist is written for a new HarnessKeys owner who wants a clean first session without turning setup into a weekend project. The goal is not to create the perfect configuration in one sitting. The goal is to prove that the device works, that the keys are easy to reach, and that your AI workflow has a calmer control layer than before.
Unbox with the first session in mind
Take the device and accessories out carefully, but do not rush into mapping keys yet. First, check that the product looks intact, the keys are not visibly damaged, and any included cable or accessory is present. If something looks damaged from shipping, take photos of the package, label, and product before discarding anything.
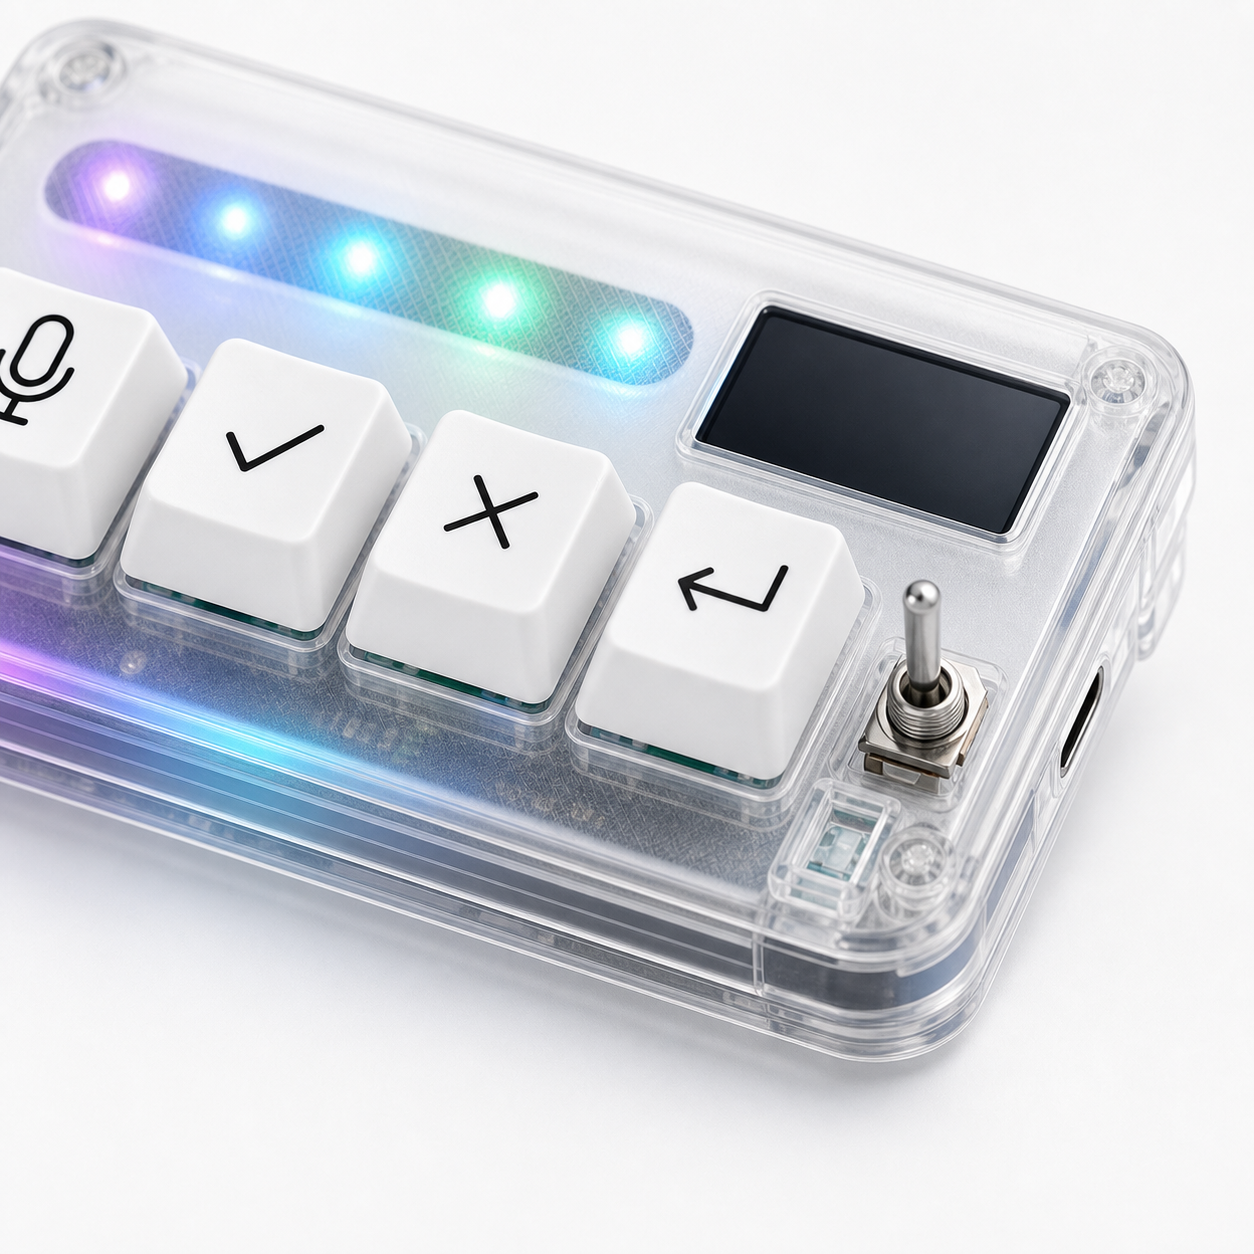
Place the keypad near your main keyboard and imagine the actions you will hit most often. Voice input should be easy to trigger without looking. Approval should feel intentional. Cancel should be reachable but not so easy to bump by accident. Return should be comfortable because you may use it often during prompt editing or agent review.
That physical layout thinking is part of setup. Do it before software mapping.
Pick one connection mode for the first test
If you have a choice between USB and Bluetooth, use the mode that gives you the cleanest first test. USB is often the calmer starting point because it removes pairing uncertainty and battery questions. Bluetooth is useful for a cleaner desk or laptop setup, but it adds one more system layer to troubleshoot.
For the first session, avoid changing too many variables at once. Connect the device, wait for the operating system to recognize it, and test it in a simple environment before opening your full AI coding stack.
If the keypad does not respond, switch ports, check the cable, confirm Bluetooth pairing if relevant, and test on another simple input field before assuming the device is defective.
Use a plain text field before touching AI tools
Open a basic text editor, browser search box, or empty document. Press each key once and observe what happens. This is less exciting than launching an AI agent, but it is the safest way to separate hardware input from application behavior.
If a key sends a character, shortcut, or action you did not expect, write it down. If nothing happens, test again in a different field. Some applications intercept shortcuts, while simple text fields reveal raw behavior more clearly.
Do not map real destructive actions until you know each key is registering.
Map only the core four actions first
For a first HarnessKeys setup, keep the first map small: voice input, approve, cancel, and return. Those actions match the product’s role in a vibe coding workflow. They cover the common loop: speak or enter an instruction, approve a safe step, cancel a bad direction, and return to the place where you need control.
Resist the urge to turn every key into a complex automation immediately. Complex mappings feel clever for an hour and confusing the next morning. A good first map should be so obvious that your hand remembers it without a label.
You can add advanced shortcuts later, after the basic loop becomes natural.
Give cancel a deliberate position
Cancel deserves special treatment because it is the key you need when an AI tool starts going the wrong way. It should be easy to find under pressure, but not so exposed that you hit it while reaching for approve. If your desk placement makes cancel too easy to bump, move the keypad or adjust your finger habit before serious use.
During setup, practice pressing cancel after a harmless test prompt. This builds the mental link: if the agent drifts, I have a physical stop signal. That confidence is one of the main reasons a dedicated keypad can feel better than remembering a scattered shortcut.
Test voice input with a boring prompt
Voice input is powerful, but your first test should be boring. Do not start by dictating a complex system design. Try a short prompt such as “summarize this file” or “explain this function.” The purpose is to test microphone permission, trigger behavior, transcription quality, and your own speaking rhythm.
If dictation does not start, check the operating system microphone permission, browser permission, app setting, and selected input device. Many voice problems are permission problems, not keypad problems.
Once a boring prompt works, try a real coding prompt.
Run one small AI coding task end to end
Pick a task small enough that mistakes will not matter: rename a variable in a scratch file, ask for a code explanation, generate a test idea, or review a tiny function. Use HarnessKeys for the main control moments. Trigger voice input, approve a harmless suggestion, cancel one intentionally bad direction, and use return to continue editing.
This proves the workflow in a complete loop. You are not just testing keys. You are testing whether the keypad reduces the number of tiny interruptions between thought and action.
If the task feels awkward, adjust placement before changing mappings.
Keep notes after the first session
After ten or fifteen minutes, write down what felt natural, what felt dangerous, and what you forgot to use. Do this while the session is fresh. Your first impression will teach you more than a perfect-looking setup diagram.
Common notes include “voice key should be closer,” “cancel needs more separation,” “approve is fine,” or “Bluetooth is convenient but USB feels steadier.” Those are useful observations. They lead to a setup that matches your desk instead of someone else’s demo.
If you hit a real order or product issue, use the contact page with your order number and clear details.
Do not overbuild the first day
The best first HarnessKeys setup is boring in the right way. It connects reliably, the keys register, the main actions make sense, and one AI coding session feels easier than before. That is enough for day one.
After that, you can refine desk placement, choose USB or Bluetooth permanently, tune voice input, and build more ambitious mappings. Start with the product page if you need to review the intended workflow: HarnessKeys AI workflow keypad.
A small controller becomes useful through repetition. Give your hand a simple pattern first, then let the fancy setup grow from real use.