Setup and Tutorials
How to Set Up a Vibe Coding Keyboard on macOS
Jun
Setting up a vibe coding keyboard on macOS is mostly about getting three layers to agree: the Mac recognizes the keypad, your input or shortcut settings behave as expected, and your AI coding tools receive the right actions in the right place. HarnessKeys can make the workflow feel smooth, but the first setup should be patient.
macOS has strong privacy controls, useful dictation features, and plenty of keyboard shortcut conventions. That is good for security and daily work, but it means a new hardware controller should be tested step by step instead of mapped all at once.
Begin with USB if you want fewer variables
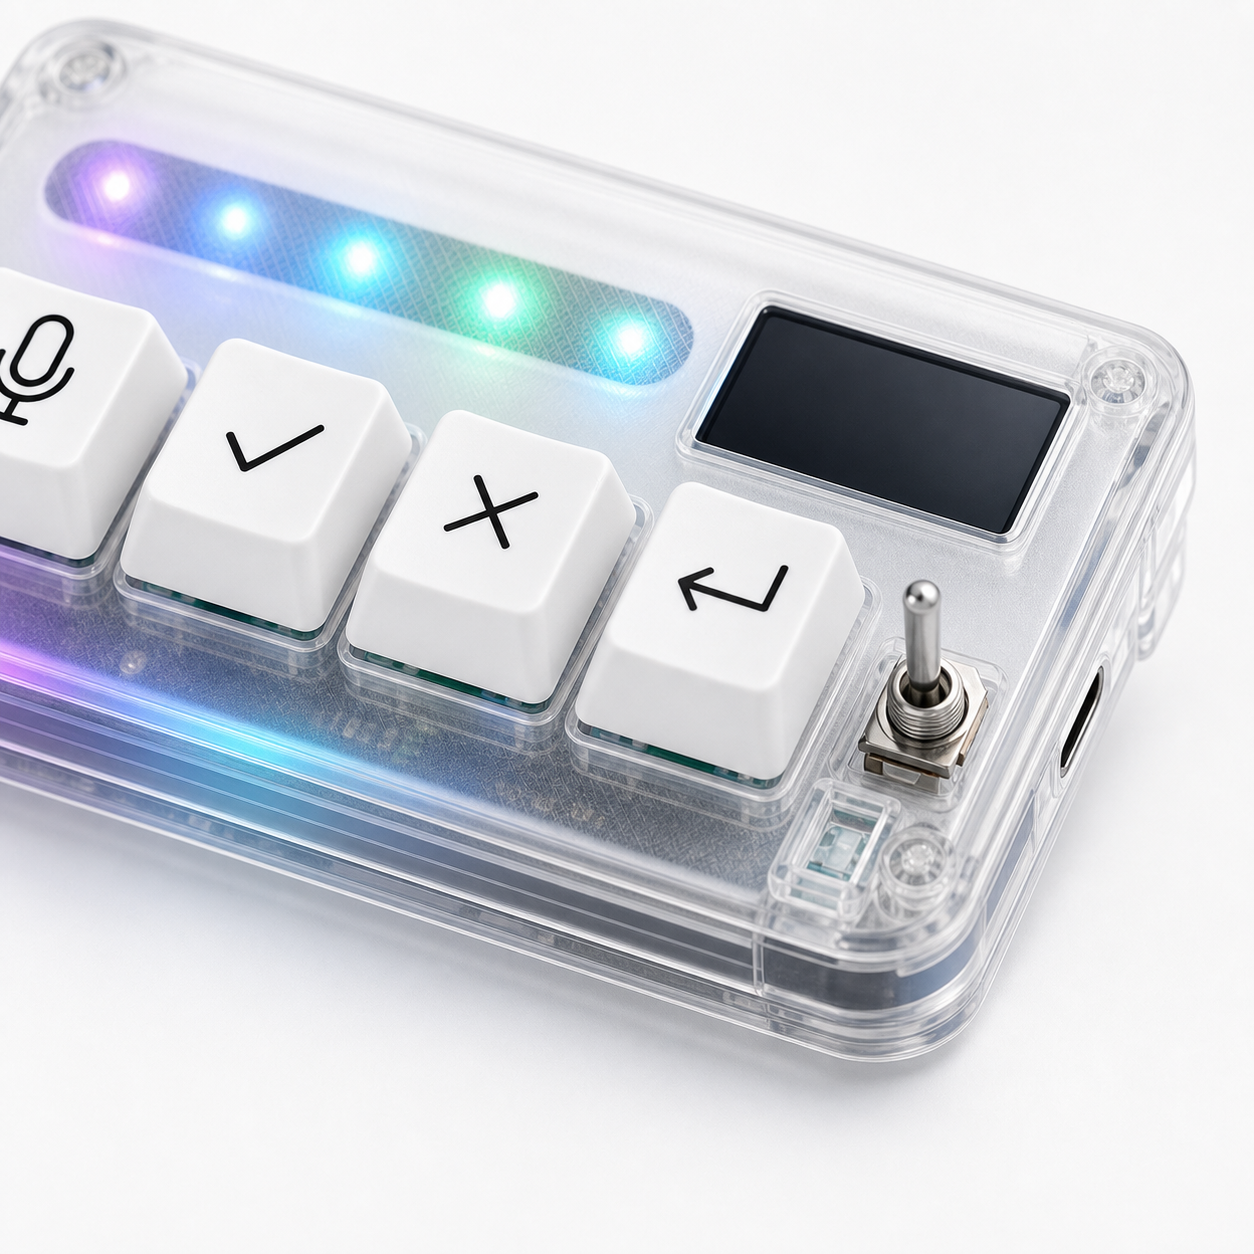
If you are setting up HarnessKeys for the first time on a Mac, USB is often the simplest starting point. Plug it in, open a plain text field, and press each key. This test tells you whether the Mac receives input before you involve Bluetooth, dictation, Cursor, ChatGPT, Codex, Claude Code, or any other AI tool.
If USB works, you have a clean baseline. If it does not, try another port, cable, or hub arrangement. Some USB-C hubs can create odd behavior with small peripherals, so testing directly can help.
Once the baseline is proven, you can decide whether Bluetooth is worth using.
Pair Bluetooth only after you know the keys work
Bluetooth can be excellent for a clean MacBook setup, but pairing adds a layer. If you choose Bluetooth, use macOS Bluetooth settings, confirm the device appears as connected, and test again in a plain text field.
Do not troubleshoot Bluetooth and AI shortcut behavior at the same time. First confirm the connection. Then confirm the key events. Then confirm the app mapping. One layer at a time is faster than guessing.
If the keypad works by USB but not Bluetooth, the problem is likely pairing or wireless state, not the whole device.
Check dictation and microphone permission
Voice input on macOS can involve system dictation, browser permission, app permission, and the selected microphone. Before mapping a mic key, start voice input manually and confirm it works in the app you actually plan to use.
If dictation does not start, check privacy settings and microphone access. Also confirm the correct input device. A Mac can see the built-in microphone, headset microphone, webcam microphone, and other audio devices at the same time.
After manual voice input works, map HarnessKeys to make it easier to trigger.
Watch for macOS shortcut conflicts
macOS already uses many keyboard shortcuts for system features, app menus, window control, Spotlight, dictation, accessibility, and browser behavior. If a HarnessKeys mapping uses a shortcut that macOS or another app already owns, the result may be confusing.
Test every shortcut in the exact app context where you need it. A combination that works in a browser may do something different in a terminal or editor. If the shortcut is already taken, choose a safer mapping instead of fighting the system.
The best shortcut is one you can trust without thinking.
Keep approve away from destructive commands
On macOS, it is easy to create powerful automation through shortcuts and app-specific commands. Be conservative with approve. Do not map it to actions that delete, overwrite, run risky commands, or accept large code changes without a review step.
Approve should support a decision you have already made. It should not make big decisions invisible. For AI coding, a good first approve action is tied to a reviewed suggestion or harmless continuation, not a one-key “do everything” macro.
Save the fancy automation for after you trust the basics.
Test cancel in terminal and editor contexts
Cancel can behave differently depending on where focus is. In a browser it might stop generation or close a dialog. In an editor it might dismiss a panel. In a terminal it may need to interrupt a running process. Test the key in each context you care about.
Do this with harmless actions. Do not wait until a tool is making a risky edit to learn what your cancel key actually sends.
A reliable cancel key is one of the best parts of a physical AI workflow controller.
Create a small macOS test routine
A good first routine is simple. Open a text field and test all keys. Open your AI tool and test voice input. Submit one harmless prompt. Approve one low-risk suggestion. Cancel one intentionally bad direction. Return to the prompt and write a follow-up.
If all of that works, your setup is ready for real but small work. If one part fails, you know which layer to inspect: connection, shortcut, microphone permission, app focus, or tool behavior.
This is much better than discovering the issue during an important coding session.
Make macOS setup boring before making it powerful
HarnessKeys should feel like a steady desk control, not a fragile automation trick. Start with a boring mapping that works across your real tools. Voice, approve, cancel, and return are enough for day one.
For product context, review the HarnessKeys AI workflow keypad. For hardware or order issues, contact support with clear details.
Once the Mac recognizes the device, permissions are clean, and shortcuts are safe, the keypad can become part of your daily AI coding rhythm.