Vibe Coding Fundamentals
What Developers Should Know Before Building a Voice-First Coding Setup
Jun
A voice-first coding setup sounds futuristic until you try to build one on a normal desk. Then the practical questions arrive fast. Which microphone should trigger? Where does the text land? How do you avoid sending half a thought? What happens when the room is noisy? How do you keep voice useful without making the whole workflow feel strange?
The best answer is to start modestly. Voice-first does not mean voice-only. It means spoken input becomes the fastest way to give intent to an AI coding tool, while the keyboard still handles exact code, filenames, commands, and careful edits. A good setup respects that split.
Start with a clear microphone trigger
The first decision is how voice begins. Always-on dictation can work for some people, but many developers prefer a clear trigger. A button, key, or push-to-talk gesture creates a boundary between thinking near the computer and speaking to the tool.
That boundary matters because coding involves a lot of half-sentences. You read a stack trace, mutter a possible cause, change your mind, and then form the real instruction. If the microphone is capturing all of that, the AI receives noise instead of intent.
A dedicated microphone key is useful because the body learns the ritual. Press, speak, release or submit. The workflow becomes deliberate, and deliberate voice input is much less awkward than open-ended dictation.
Decide where spoken text should land
Voice input needs a destination. Is it going into an AI chat box? A command palette? A prompt field inside an editor? A note that you revise before sending? If you do not decide this early, voice becomes unreliable because the same spoken instruction may land in different places.
For AI coding, the safest starting point is usually a prompt field that you can review before sending. That gives you one last check for transcription mistakes. It also keeps voice from accidentally executing a command or submitting something incomplete.
Once the habit is stable, you can make it faster. But the first version should prioritize confidence over speed. Developers abandon voice quickly when the setup surprises them.
Use voice for explanations, not everything
Voice is excellent for explaining context: “This bug only appears when the cached value is empty, so inspect the fallback path and do not change the public schema.” That is a natural spoken instruction and a useful AI prompt.
Voice is weaker for exact strings. Package names, flags, variable names, and shell commands are easy to mishear. If a symbol matters, type it. If the idea matters, say it. That simple rule prevents a lot of frustration.
Developers who enjoy voice-first workflows often use a hybrid style. They speak the objective, type the precise details, then use a physical key or normal shortcut to send the final prompt. That feels much more practical than trying to dictate every character.
Noise control is part of the setup
A voice-first workflow is only as good as the audio the computer receives. You do not need a studio microphone, but you do need consistency. Laptop microphones can work in quiet rooms. A headset or closer microphone may work better if fans, keyboards, or other people are nearby.
Think about privacy too. Spoken prompts can reveal product plans, customer issues, internal architecture, or security-sensitive details. If the room is shared, voice may not be the right mode for that session. A good setup makes it easy to fall back to typing without feeling like the workflow has failed.
Push-to-talk also helps here. It limits accidental capture, reduces background noise, and makes voice input feel more respectful in shared spaces.
Route shortcuts before adding complexity
Many people start by buying hardware or installing advanced automation tools. The better first step is to map the simple route. What starts listening? What stops listening? What submits? What cancels? What approves output from the AI tool?
If those routes are unclear, extra features will not help. The setup will feel impressive for a day and annoying for a week. Keep the first version boring: one voice trigger, one submit action, one cancel action, one approve action.
After that, watch real usage. If you keep reaching for the mouse to approve, that action deserves a better control. If you never use voice in public, that is fine. Let the workflow reflect your actual desk, not a demo video.
A first-week checklist that actually helps
For the first week, do not try to optimize everything. Pick one AI coding tool and one project. Use voice only for prompts that explain intent or constraints. Review the transcript before sending. Keep exact names typed. Use cancel quickly when the AI drifts. At the end of each day, note which repeated actions felt clumsy.
By the end of the week, you should know whether voice is solving a real problem. If you spoke more complete prompts, avoided prompt fatigue, and kept the AI better scoped, the setup is worth improving. If it felt awkward every time, you may prefer a keyboard-first workflow with dedicated approve and cancel controls instead.
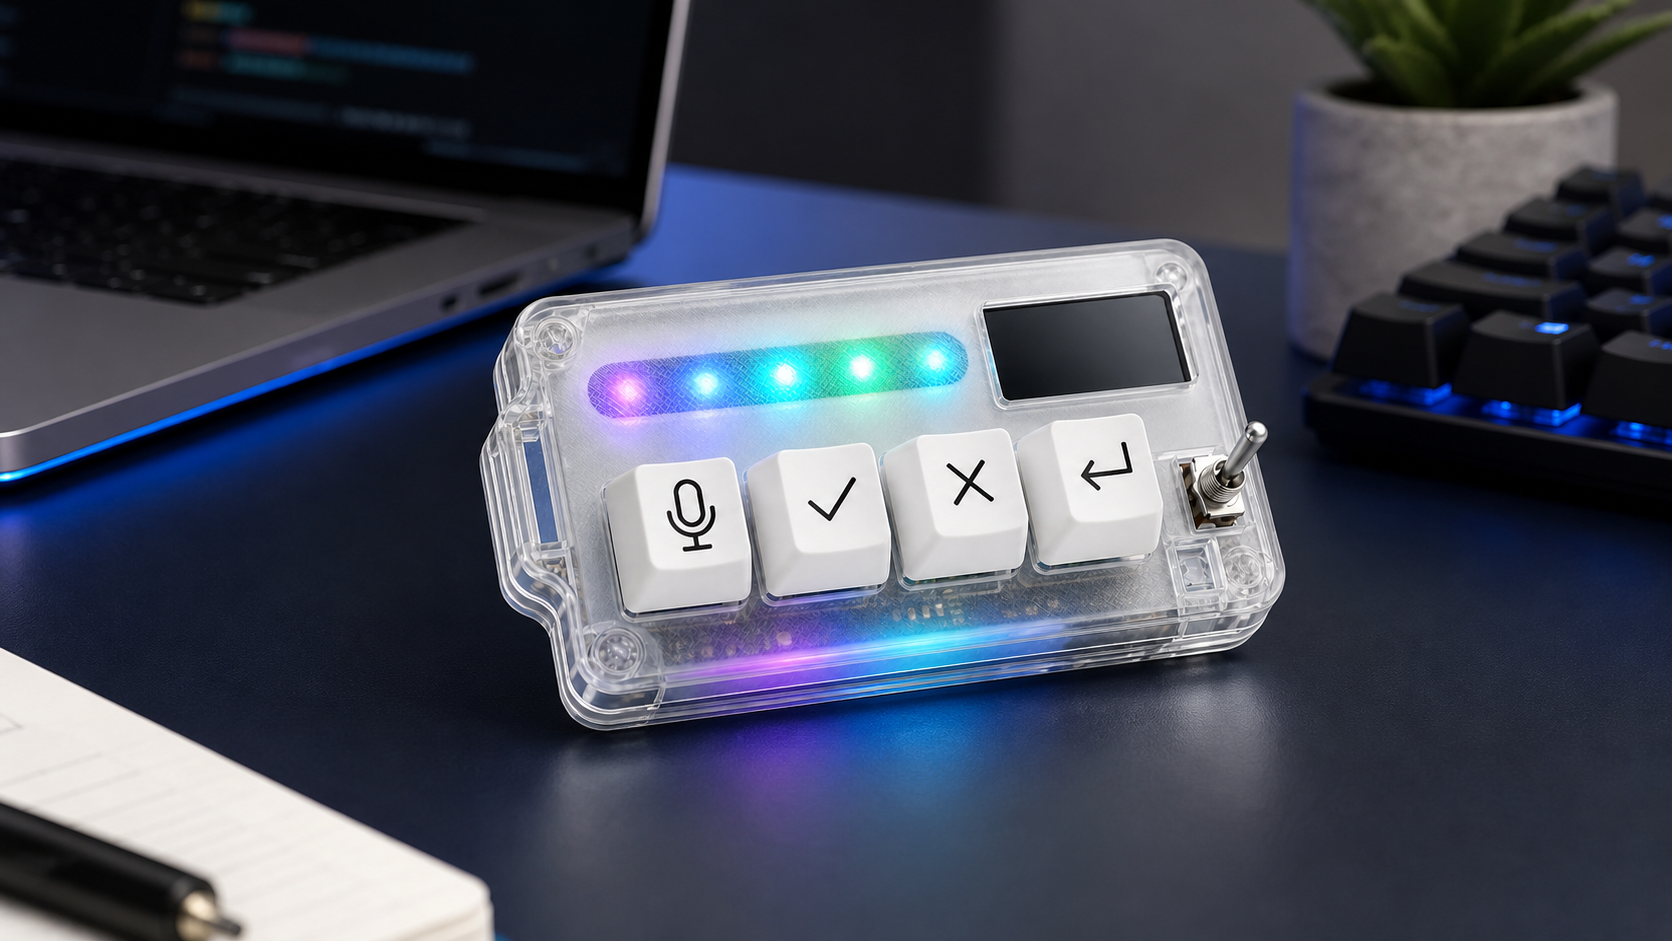
HarnessKeys can support either style. Its microphone, approve, cancel, and return-style keys are designed for the repeated AI workflow loop, while USB and Bluetooth support make it easier to place on different desks. The custom status screen and RGB light bar add quick feedback without turning the device into a large dashboard.
A voice-first coding setup should feel calmer, not theatrical. Start with a clear trigger, choose the destination, protect privacy, and keep typing where exactness matters. When the spoken part of your workflow is ready for a physical control, the HarnessKeys AI Workflow Keypad is built for that kind of small, deliberate desk habit.