Workflow Design
A Beginner-Friendly Vibe Coding Session Template
Jun
A beginner-friendly vibe coding session should feel structured, not chaotic. The promise of AI coding is that you can move quickly, but speed without a session shape turns into wandering prompts, half-reviewed changes, and a confusing diff. A simple template helps you use the AI tool without letting it take over the work.
This template is intentionally small. It is for developers who want to start a productive AI coding session with clear checkpoints: define the task, provide context, generate a first result, review the output, then approve, cancel, or continue.
Step one: define the task in one sentence
Before opening the AI tool, write or say the task in one sentence. For example: “Fix the empty-state bug in the settings page without changing the public API.” If you cannot say the task clearly, the AI agent will probably struggle too.
The sentence should include the target and a boundary. Target: what should change? Boundary: what should not change? Beginners often skip the boundary, then wonder why the AI touched too many files.
Do not start with “make this better.” Start with a specific move.
Step two: expose the right context
The AI needs context, but not all context. Open the relevant file, select the error, paste the failing test, or point the tool to the specific function. Too little context produces guesses. Too much context can produce broad, unfocused answers.
If you are using voice input, context should come before speech. The spoken prompt can then frame the material instead of trying to describe everything from scratch.
A useful beginner habit is to ask: “What would I show a teammate if I wanted help with this in two minutes?” Give the AI that, then add the instruction.
Step three: generate a first narrow answer
The first AI request should usually be narrow. Ask for an explanation, a plan, or a small patch. Avoid asking for a full rewrite unless the task truly needs it. A narrow first answer is easier to judge.
For example: “Explain why this test fails and suggest the smallest fix. Do not edit files yet.” That prompt gives you information without committing the codebase to a direction.
Once the explanation makes sense, you can ask for the implementation. This two-step approach feels slower at first, but it often prevents messy cleanup later.
If you are using an agent that can edit files directly, this narrow first request is even more important. Beginners should learn what the AI thinks before letting it act. A short explanation step reveals whether the tool understands the code path, the failure, and the boundary.
Step four: review before approving
Review is where the developer stays in control. Read the answer. Check whether the AI respected the boundary. If it changed code, inspect the diff. If it wrote tests, make sure the tests would fail for the right reason. If it claims a command passed, verify the actual output when possible.
A physical approve key can help after review, but it should not replace review. Think of approval as the hand’s way of recording the brain’s decision.
If the result is useful but incomplete, do not approve blindly. Ask for the next narrow step.
A beginner can use a simple review checklist: did the AI touch the expected files, did it keep the original behavior where required, and can I explain why this change should work? If the answer is no, slow down before approving.
Step five: cancel early when the path is wrong
Beginners often let the AI continue too long because they are curious to see where it goes. That curiosity creates noise. If the agent starts editing unrelated files, inventing requirements, or ignoring constraints, cancel.
Cancellation is not a failure. It is a checkpoint. Stop the current path, restate the boundary, and ask for a smaller answer. This habit is one of the fastest ways to make AI coding feel less chaotic.
Step six: continue with a better prompt
After review or cancellation, continue with what you learned. “That is too broad” is not enough. Say what should change: “Keep the fix inside the parser. Add one test for empty input. Do not change the schema.” Each turn should make the task sharper.
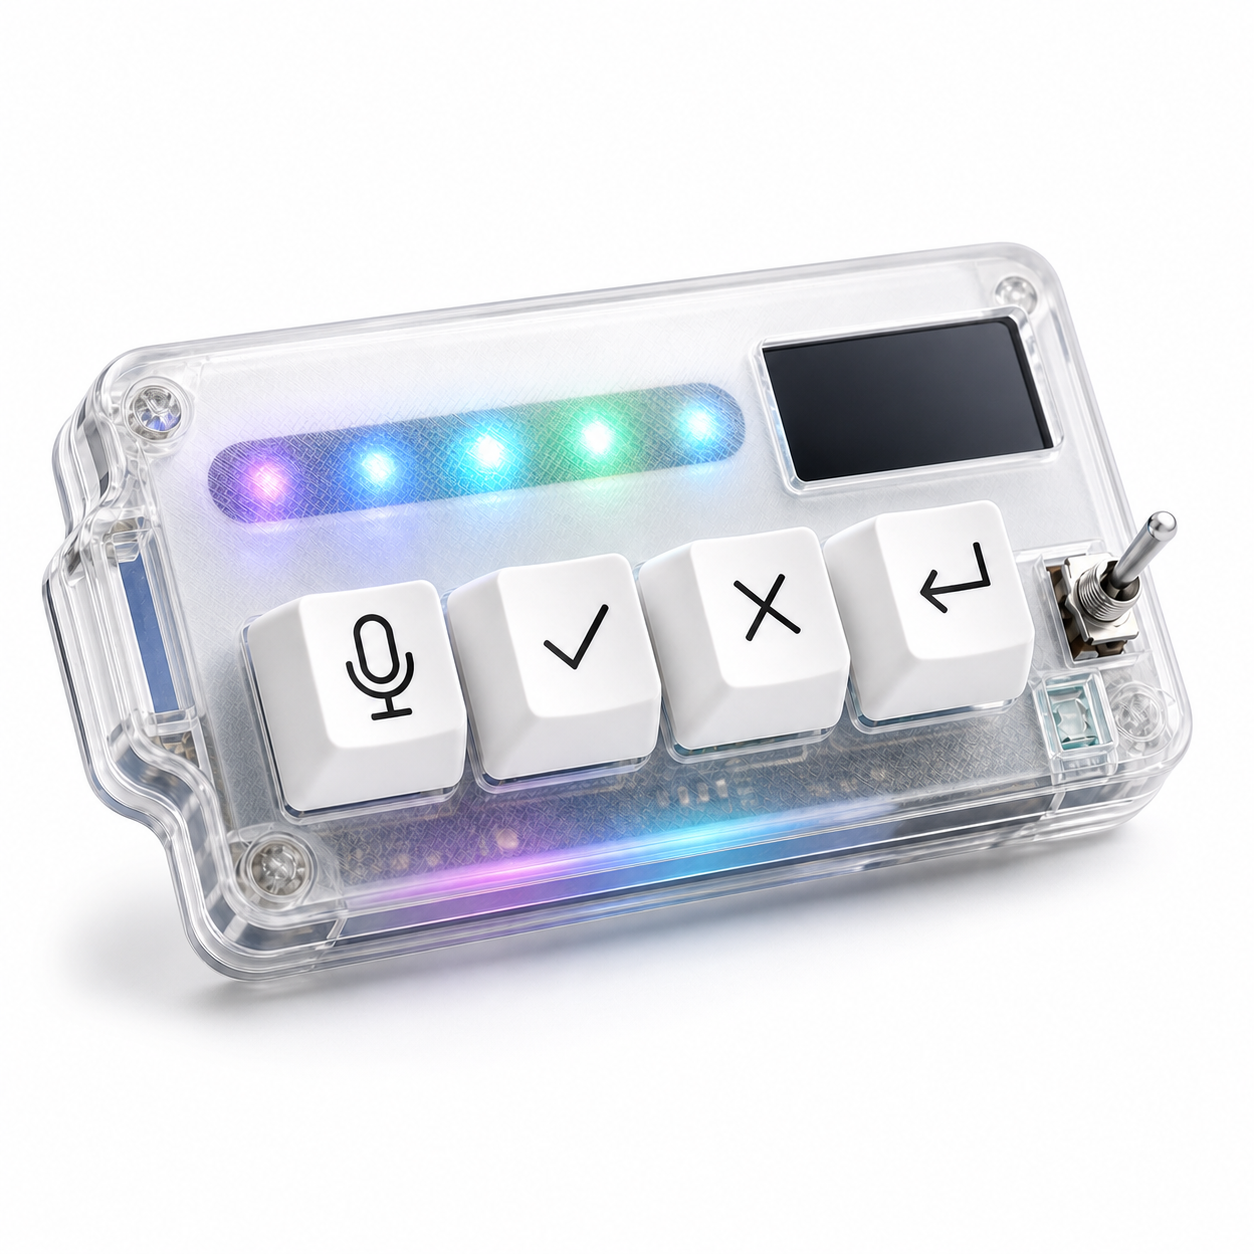
This is where a four-key workflow can help. Microphone captures the next instruction, approve records accepted output, cancel stops drift, and return sends or continues the next turn. The device does not supply the discipline, but it makes the disciplined loop easier to repeat.
HarnessKeys is built around those four actions, with USB and Bluetooth support, a custom status screen, an RGB light bar, and a compact body that can sit beside the main keyboard. It fits this beginner template because the controls are limited and easy to remember.
A good vibe coding session is not a long conversation with no checkpoints. It is a sequence of small, reviewed turns. Define, give context, generate narrowly, review, approve or cancel, then continue with better information. If you want physical controls for that loop, the HarnessKeys AI Workflow Keypad gives the beginner workflow a simple shape.